KB ARTICLE
Overview
This article describes three methods for managing sub-assemblies in FactoryLogix:
-
Adding a sub-assembly collection activity in FactoryLogix Office
-
Replacing a sub-assembly on the shop floor in FactoryLogix Operations
-
Removing a sub-assembly using the Unit Genealogy tool
Add a sub-assembly collection activity in FactoryLogix Office
-
Log into FactoryLogix Office.
-
Navigate to and open the process flow you want to modify.
-
Add an operation with a Standard step, then add a Sub-Assembly Collection activity to that step.
-
Release the process to production.
When a unit passes through the operation containing the Sub-Assembly Collection activity, the sub-assembly linked in the BOM is collected automatically.
Replace a sub-assembly in FactoryLogix Operations
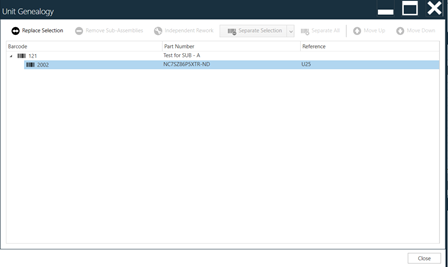
The Unit Genealogy gadget must be configured in an operator interface template to allow shop floor operators to replace sub-assemblies. The Unit Genealogy gadget displays a tree where the topmost item is the parent assembly. Each subsequent item shows the relationship between a sub-assembly and its parent, including the UID of the sub-assembly, its part number, and an optional reference designator.
-
Log into FactoryLogix Operations.
-
Open the Unit Genealogy gadget.
-
Select the sub-assembly you want to replace, then select the Replace Selection button.
-
Enter the barcode or UID of the replacement subassembly.
-
Select the Replace Barcode button to apply the change.
The sub-assembly is now replaced with the new UID.
Important
When Replace Selection fails to locate the original Sub-Assembly Collection activity for the selected sub-assembly, the gadget uses a generic Sub-Assembly Collection activity instead. In this case, the Requires Known Units property is enforced and all other properties are unselected. The replacement sub-assembly must use the same assembly part number as the original or an acceptable Alternate part number.
Remove a sub-assembly
-
Log into FactoryLogix Operations.
-
Open the Unit Genealogy gadget.
-
Select the sub-assembly you want to remove, then select the Remove Sub-Assemblies button.
-
Confirm on the next page that you want to remove the selected sub-assembly and it is removed from the unit's genealogy.
Separate a child sub-assembly from a parent (SQL method)
A SQL statement is available to separate a child sub-assembly barcode from its parent assembly barcode directly in the database. Contact Aegis Technical Support to obtain the SQL statement.
Warning
Only perform the SQL-based separation if you are comfortable working directly with the FactoryLogix database. Run the statement against a database backup first and validate the results before applying the SQL statement to a production database.